![]()
![]()
|
|---|
![]()
![]()
Active (Player) Pressure Grids full explanation with samples
Pressure Grid Session.zip
One aspect of coaching that I have tried to impart in this book is a new approach to the way you structure and think about your coaching sessions. I always liked to put players in a simulated situation as close to what they should expect in a soccer match and I have put pressure points in most of my grids. To achieve this I use other players, markers and training posts to increase pressure on players.
Passive Pressure (Markers and Posts)
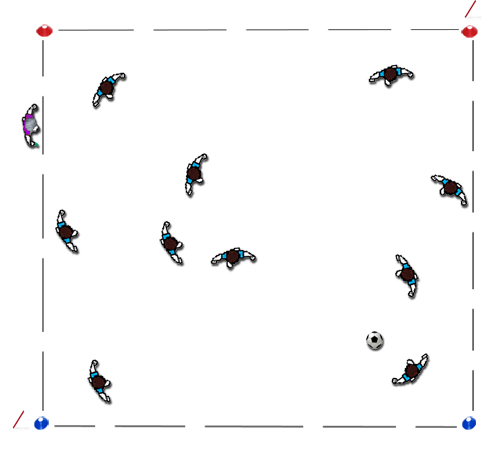
Lets start with a simple warm up The Passing Square (W002 Passing The Passing Square.doc)
Here we have a 20 x 20 square with markers on each corner.1. Players have one ball and pass the ball inside the grid. OK so you can get them to pass with the wrong foot, use inside only or outside of boot passes or even chip passes, but there is NO PRESSURE on the players apart from the ball going outside the grid.
2. So lets add some pressure, put in two players holding a bib as defenders and they can intercept any pass (no tackling) and will change with the player making a poor pass or ball passed out of the grid. Players now have to think about the passes and need to move to better angles.
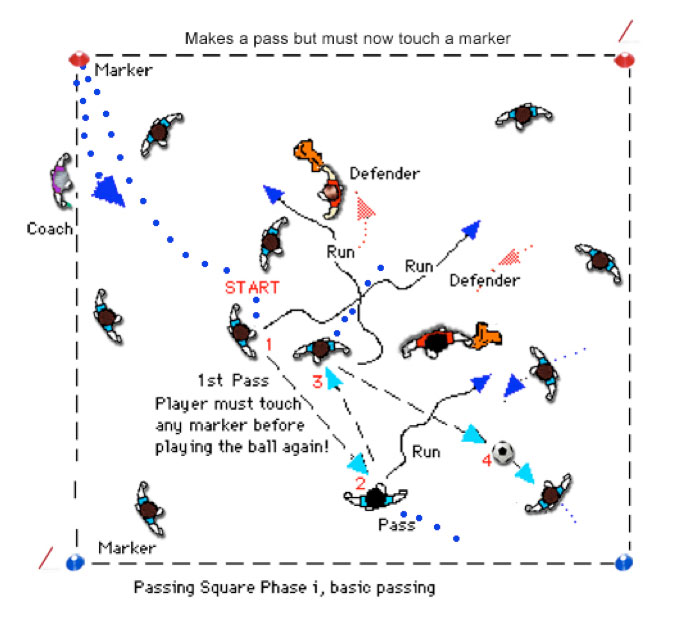
3. So you will find that players will double up passing back and forth to draw a defender but we can increase this pressure with another pressure element. What if after a pass a player must touch a corner marker BEFORE playing the ball again!
Now player 1, players 2 and 3 must be now moving to touch a marker BEFORE playing the ball again. We have added elements of speed, thinking and movement, plus putting all attacking players under pressure.
4. We now add another pressure element for senior or semi-pro teams, put a post outside of the grid and players must run around or touch the post after they pass a ball, you can decide if you want 1, 2 or more posts.
Next we look at player pressure grids
Players will become more productive if they are working under pressure and if you use the grids several times you will see players moving to combat the increased pressure load against an opposing player.
You will find players moving quicker to get to 'run around posts' or 'touch markers' that have been set up to add pressure points to the grids. I cannot support those boring static grids or short sprint to a marker and back, so I encourage you to try my method of pressure coaching and see if your players increase their sprinting ability when placed in a one on one race to a ball.
Player Pressure Grids
Using grid B001 Attacking Pressure Shooting.doc and see how the elements of fitness are used in the pressure grid, yet without the players being aware of it, they are sprinting and running with an objective in mind, concentrating on their roles and enjoying themselves. Compare this to a sprinting session to markers - players will run the same distance but in B001 they will develop better ball skills, improve their fitness and run faster!
Here is the set up, attacking player runs towards goal (around a pressure post) and shoot when possible, defenders make the first pass then run in and try to defend (after running around their pressure pole). Set up the following grid. Put in a goalkeeper, attackers on the center (blue marker) near the half way line and defenders with a ball next to the goal line (blue marker)
1. Start - The defender dribbles in and passes through the mini yellow goal towards the post opposite
The attacker takes off as soon as the ball is passed and runs around a PRESSURE POST to dribble the ball.
The defender takes off around the defenders pressure post and sprints into the grid.
Pressure - At some point in the middle the attacker will get a shot on goal or the defender will tackle the ball.
Players swap roles after each run, but the pressure that is applied forces the players to move at speed and purpose and work very hard to achieve a result.
You can adjust the posts to favour attacker or defender and your player fitness but this is what I mean by applying pressure to my grids. 90% of the Ball Skills and Match Practice grids include pressure.
2. Here is the grid which can be set up on either side of the pitch to encourage wrong foot play or variations
(i.e. Defender can chip pass the ball towards the attackers post).
The actual grid B001 Attacking Pressure Shooting.doc
Here is the full session using pressure grids
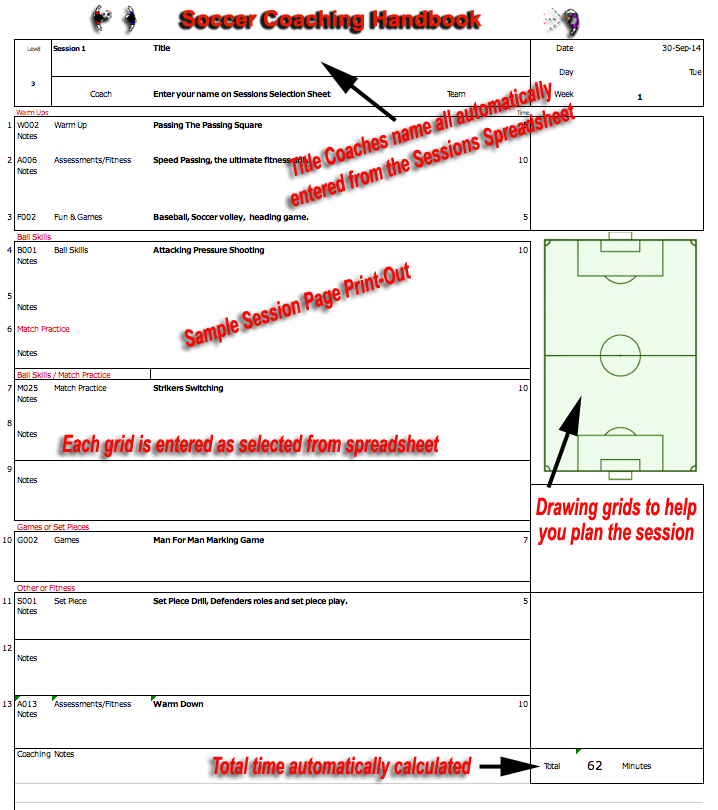
below is a sample set for a 70 minute session using various grids.
A Coaching Session Sample (7 Grids & 1 Planner)
Of course not all these grids have pressure elements, because some are designed for warming up players or just having fun and if you and your players can have fun whilst using these grids then everyone will end up satisfied, especially you, because if your sessions are well structure, include lots of ball work and are enjoyable, you will attract more players to your club. The main purpose of this book is to give you a starting point for designing your own week by week coaching sessions.
This Soccer Coaching Handbook is FREE to all users
subject to recognition of the author.
Session 27 A sample 1 of 104 Why not download your first coaching session get started immediately
click on this link for a ready to use session
Warm Up: W002 Passing The Passing Square.doc
Warm Up Fitness: A006 Speed Passing Fitness Run.doc
Ball Skills: B001 Attacking Pressure Shooting.doc
Ball Skills Specific: B006 Shooting 1 v 1 Pressure.doc
Match Practice: M009 Attacking Working Goal Line Crosses.doc
Game: G002 Man on Man Game.doc
Warm Down:013 W013 Warm Up_Down Chart
Terms & Conditions

![]()
I strongly suggest that you download the planning sheets from Coaching Tools, then save grids as you need them and put them into a folder. Create your sessions using grids from either Warm Up, Ball Skills, Match Practice, Fun, Set Pieces, Fitness or Games grids.

Original produced in 1996 copyright 1997 and 2014
There are four pre-prepared session spreadsheets, these have been created for the four levels of skill and contain 26 sessions in each sample, ready to print out. Pick the level that you are coaching and download the completed spreadsheet, this will give you a start to your coaching. As you progress you can create more sessions using the same spreadsheet or make a copy then select new or variations from over 200 grids, or drills listed in the spreadsheet. You can then print each grid ready to use in your own sessions.
Sessions Level |
Suitable For |
Explanations |
Level 1 |
|
|
Level 2 |
|
|
Level 3 |
|
|
Level 4 |
|
|